We started this project to convert an unused closet by our back door into a walk-in pantry for extra storage. I say that because what it became was much more. Can you relate? Mr. Bayou, a project manager, calls it “scope creep.” It means that the project grew far beyond my original little idea.
I started by painting the new space a light gray, Sherwin Williams’ Agreeable Gray, that I had color-matched at Lowe’s in a satin finish scrubbable paint. Of course I had to also paint the hallway that connects it and the laundry room too!
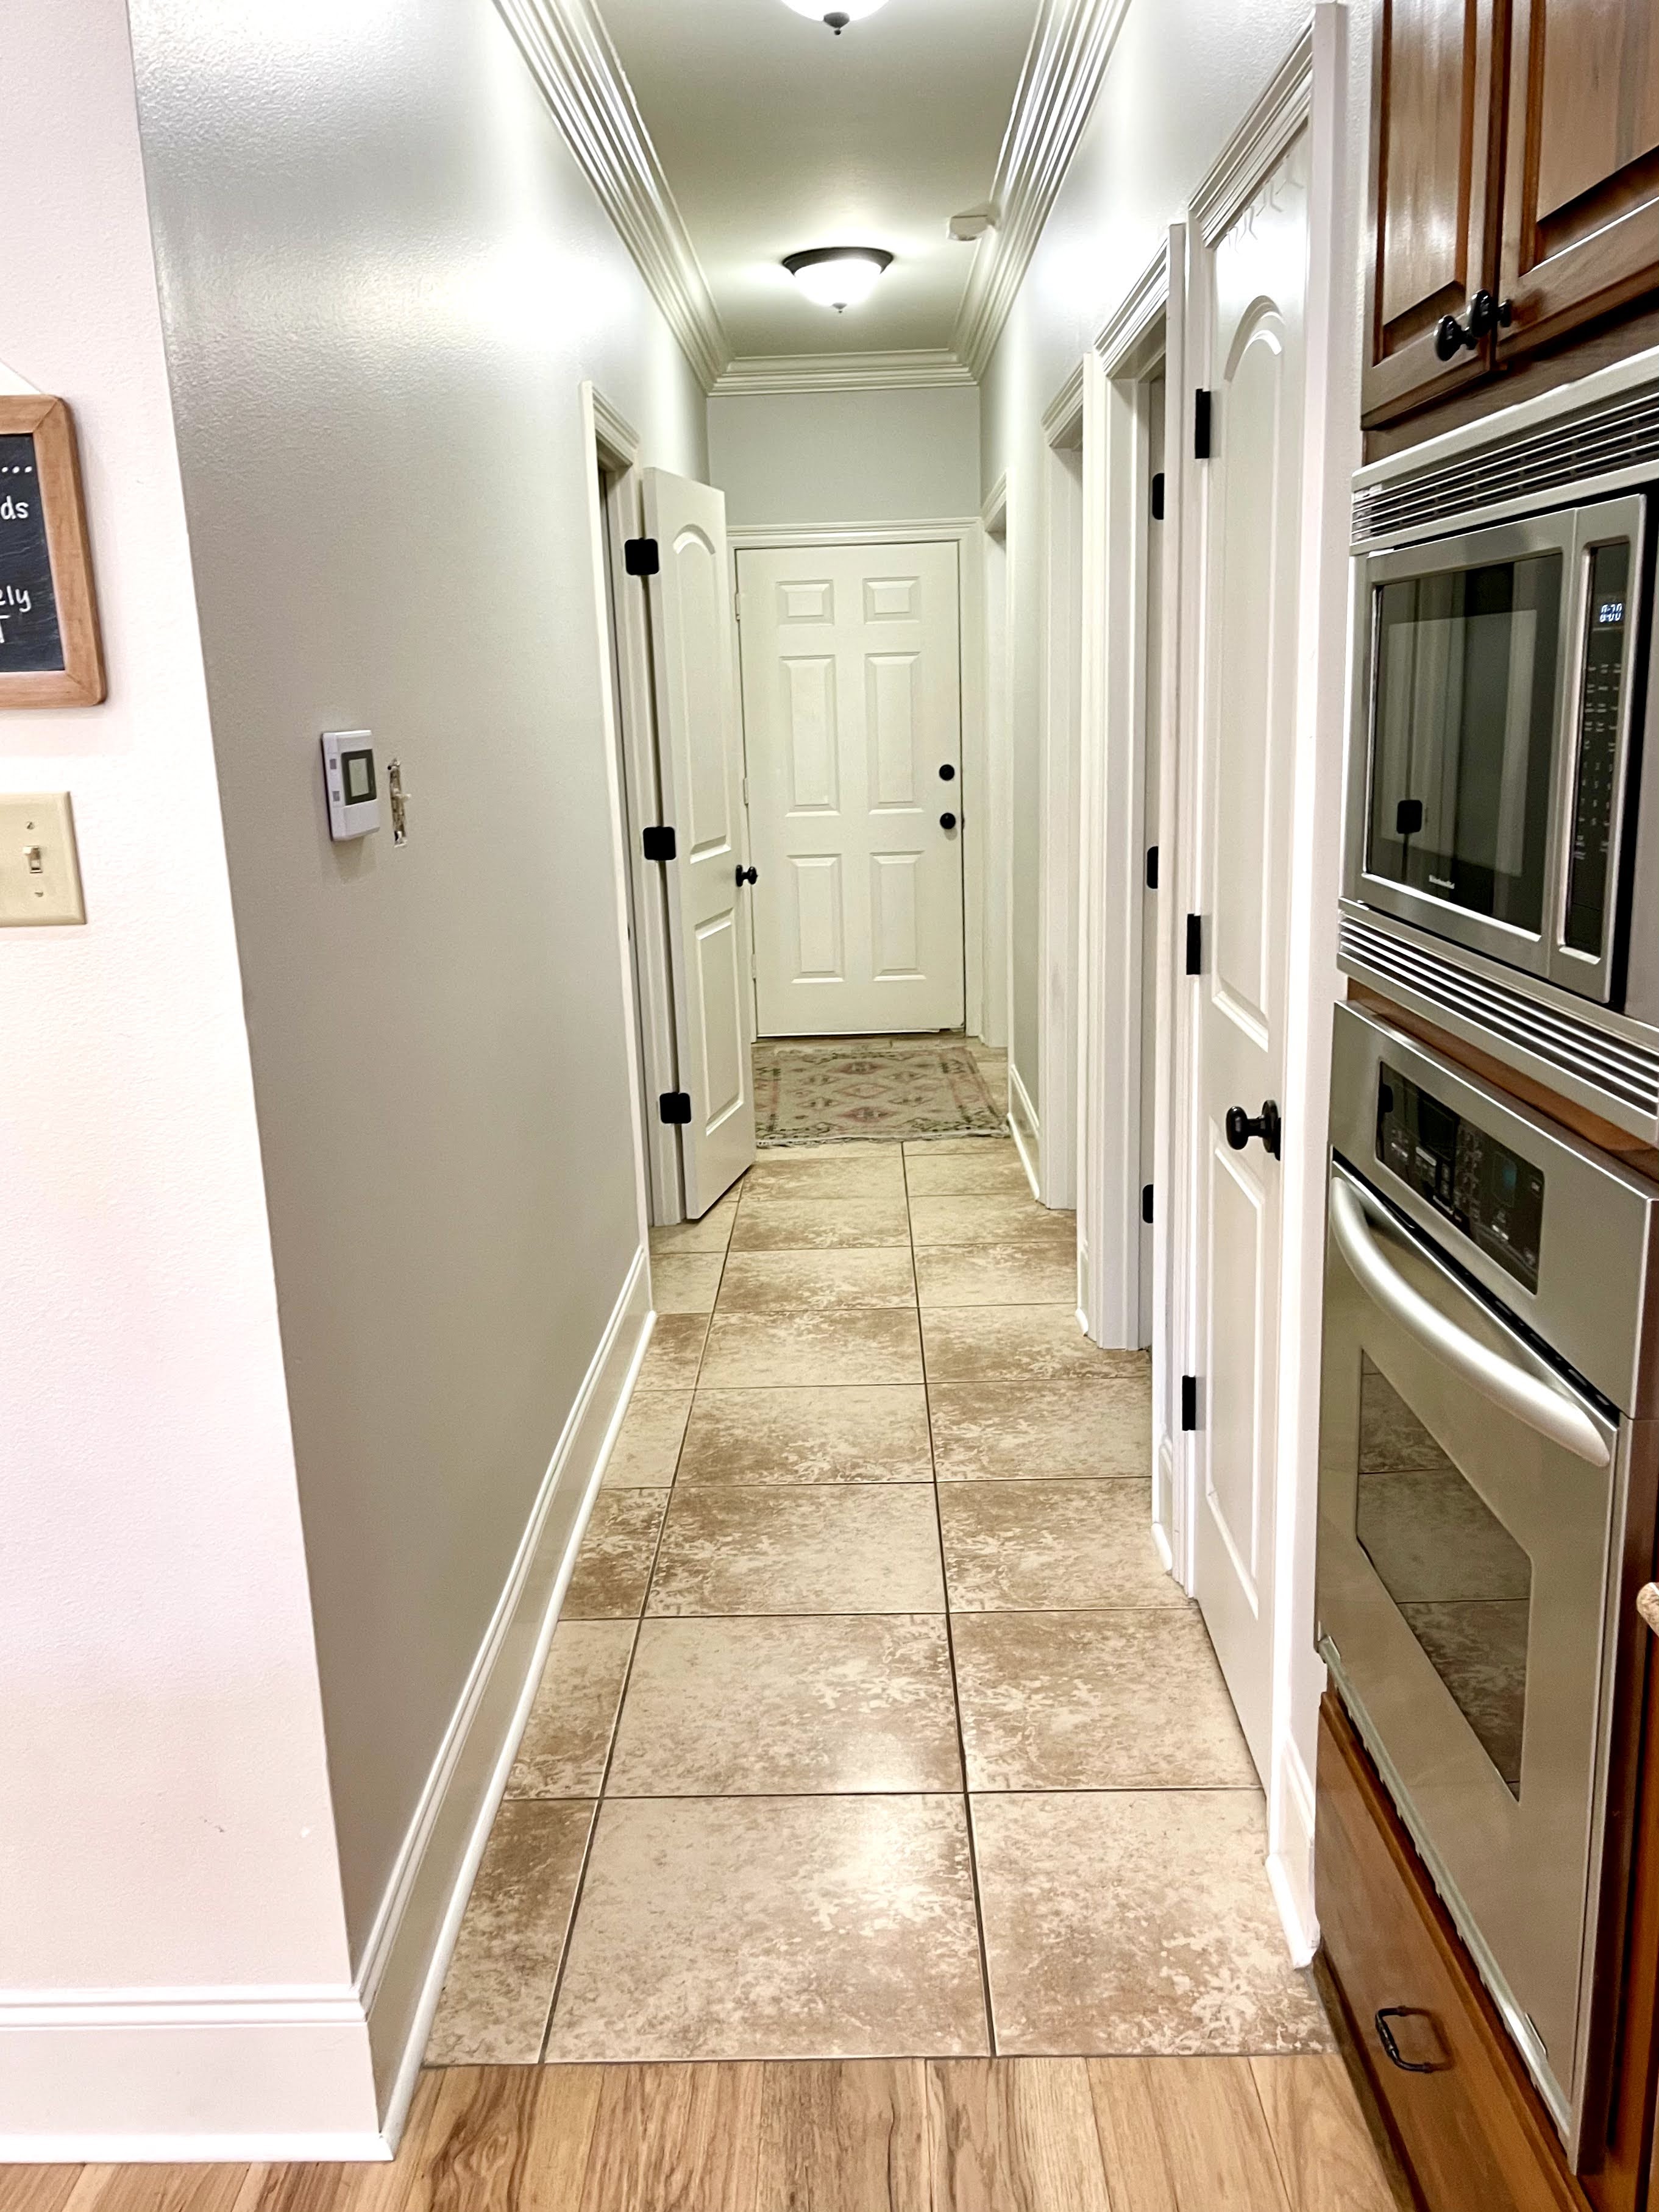
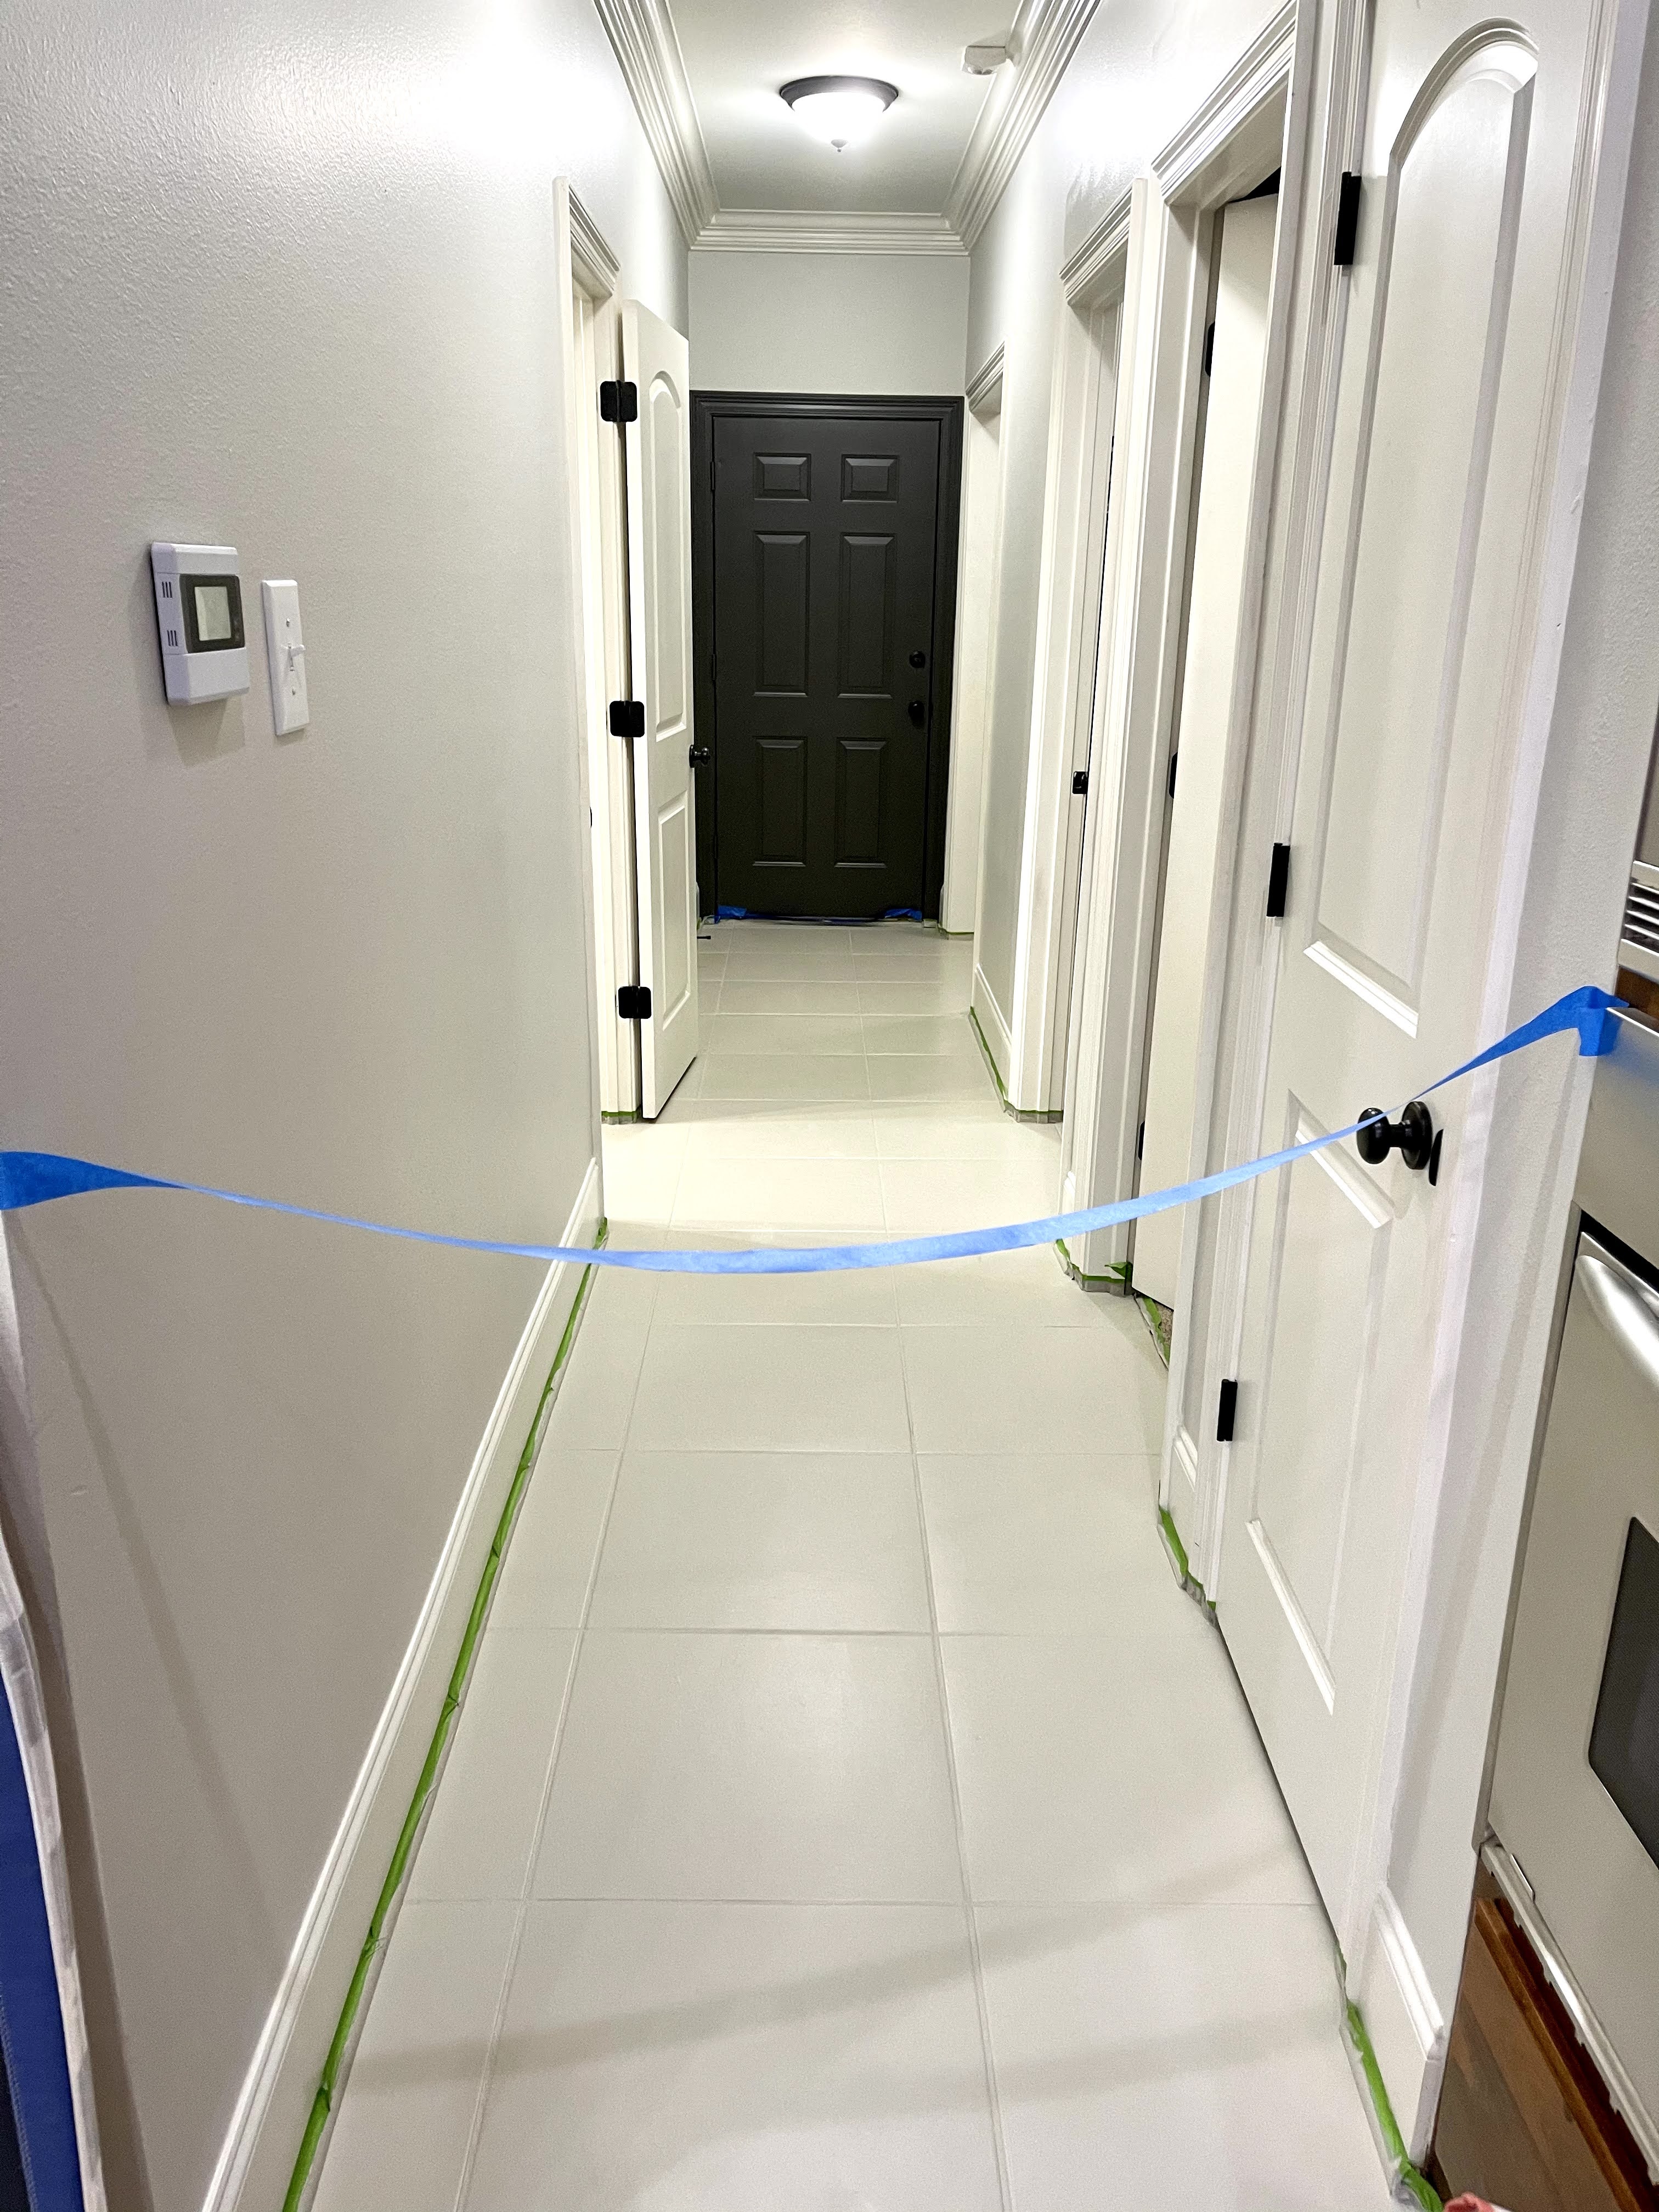
The paint color that was there before was from when our house flooded in 2016. We had the whole thing repainted, but SW messed up on the paint. What was meant to be a warm cream turned into a fleshy pink-beige. At the time, we cared much more about getting into our house than having the perfect paint color on the walls! So we didn’t fix it. I didn’t think it was that bad.
Sorry for that little detour… back to the pantry… I also decided that the hallway needed a pop at the end, so I painted the door that connect to our garage SW Urbane Bronze. The door was in terrible shape, so this needed to be done anyway. You see where this is going, don’t you? Bayou Blonde Tip: I primed the door before I painted it. This is a necessary step for doors and cabinets, if you want the paint to stick.

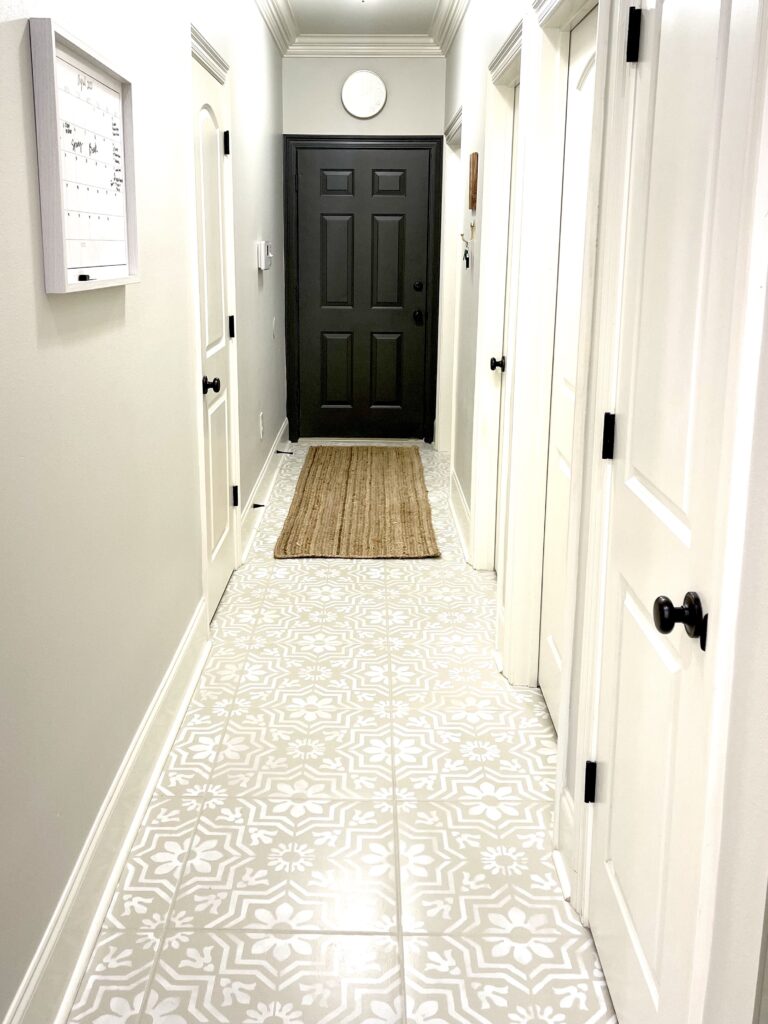
Once everything was painted and pretty, I realized how awful our tile floors looked. Even with paint that had been carefully selected to coordinate with the orange undertones in the tile, it didn’t look fresh or clean. We picked tile to replace the floors, but the cost was really more than we wanted to spend right now.
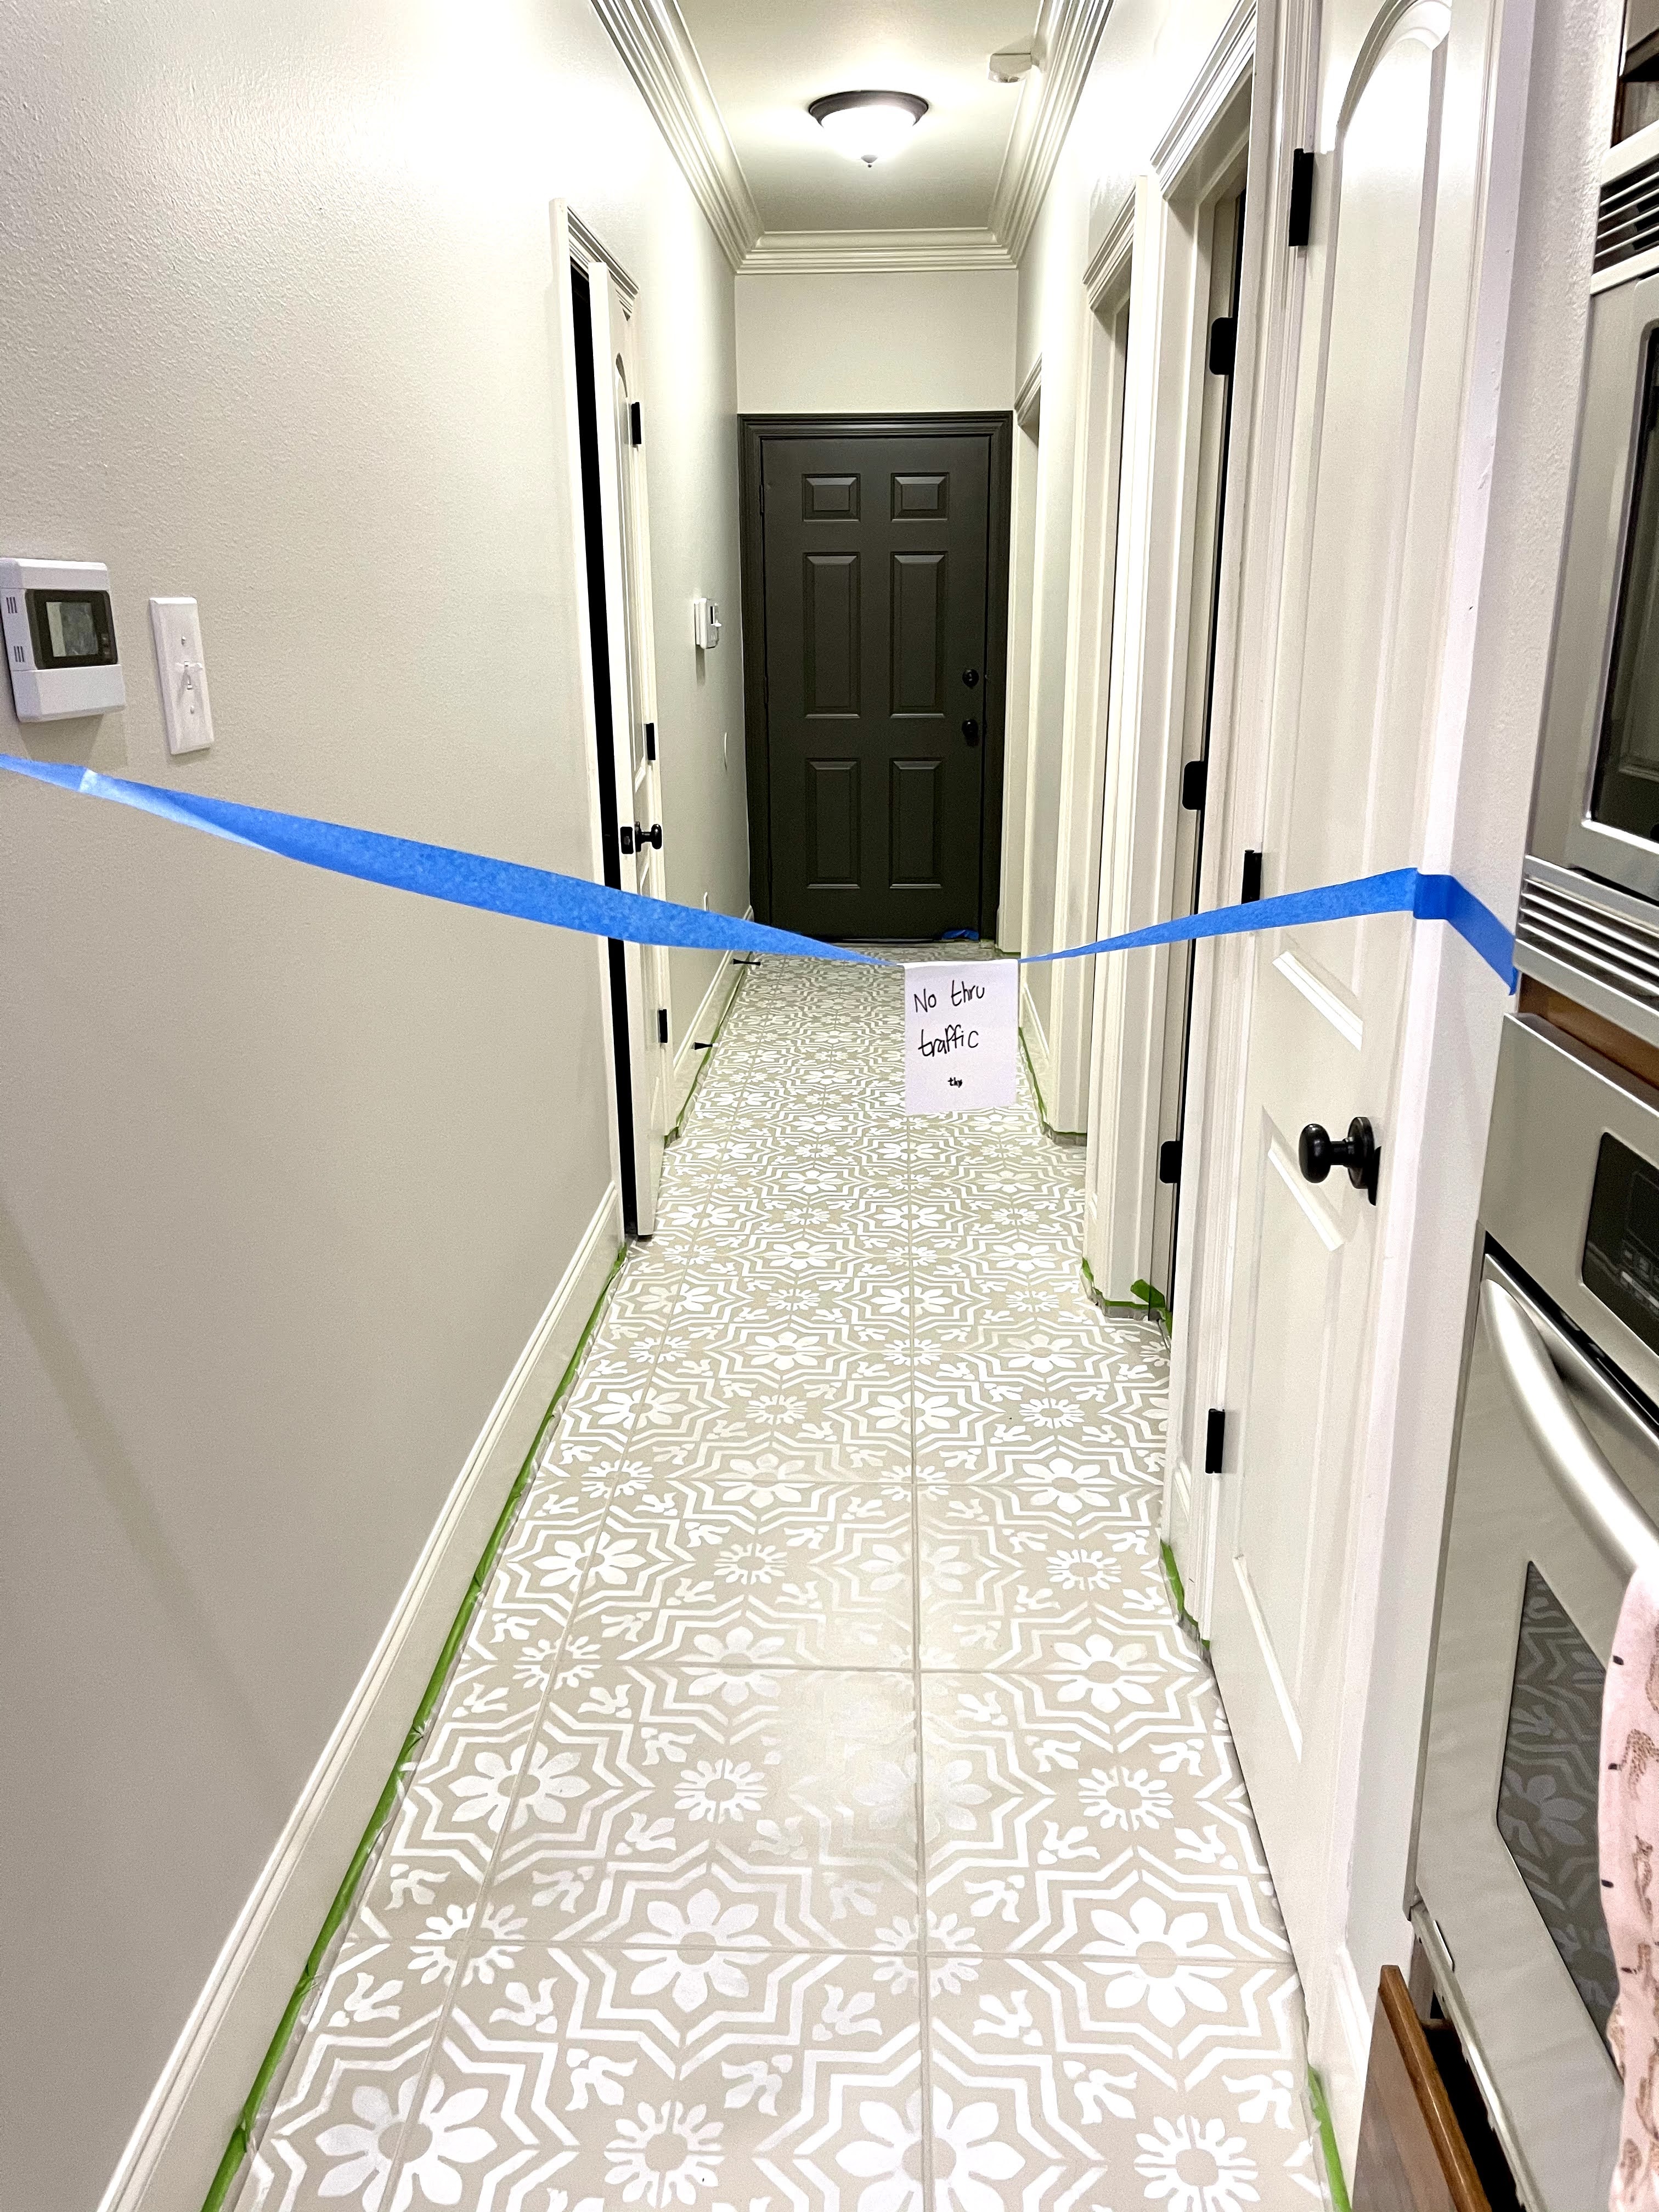
I decided to try painted tile. I’d seen several pictures and read tutorials. I figured that it certainly wouldn’t make the tile worse! If it was awful, we would just re-tile it later.
Step 1: Painting the Tile
I chose to use Rustoleum Floor Paint from The Home Depot in the Greige color. This paint can be tinted to several different colors. Look for the brochure by the paint cans to see the options. You can also order it already tinted online. The instructions on the can say that there is no priming or sanding required. I did sand the floors lightly before I began. The floors had some sticky spots in places, and the sanding helped get all of that up. You could probably skip the sanding. To prep the tile, I mopped with TSP (Trisodium Phosphate) powder mixed with water. Then, I mopped it again with water to make sure there was no residue.
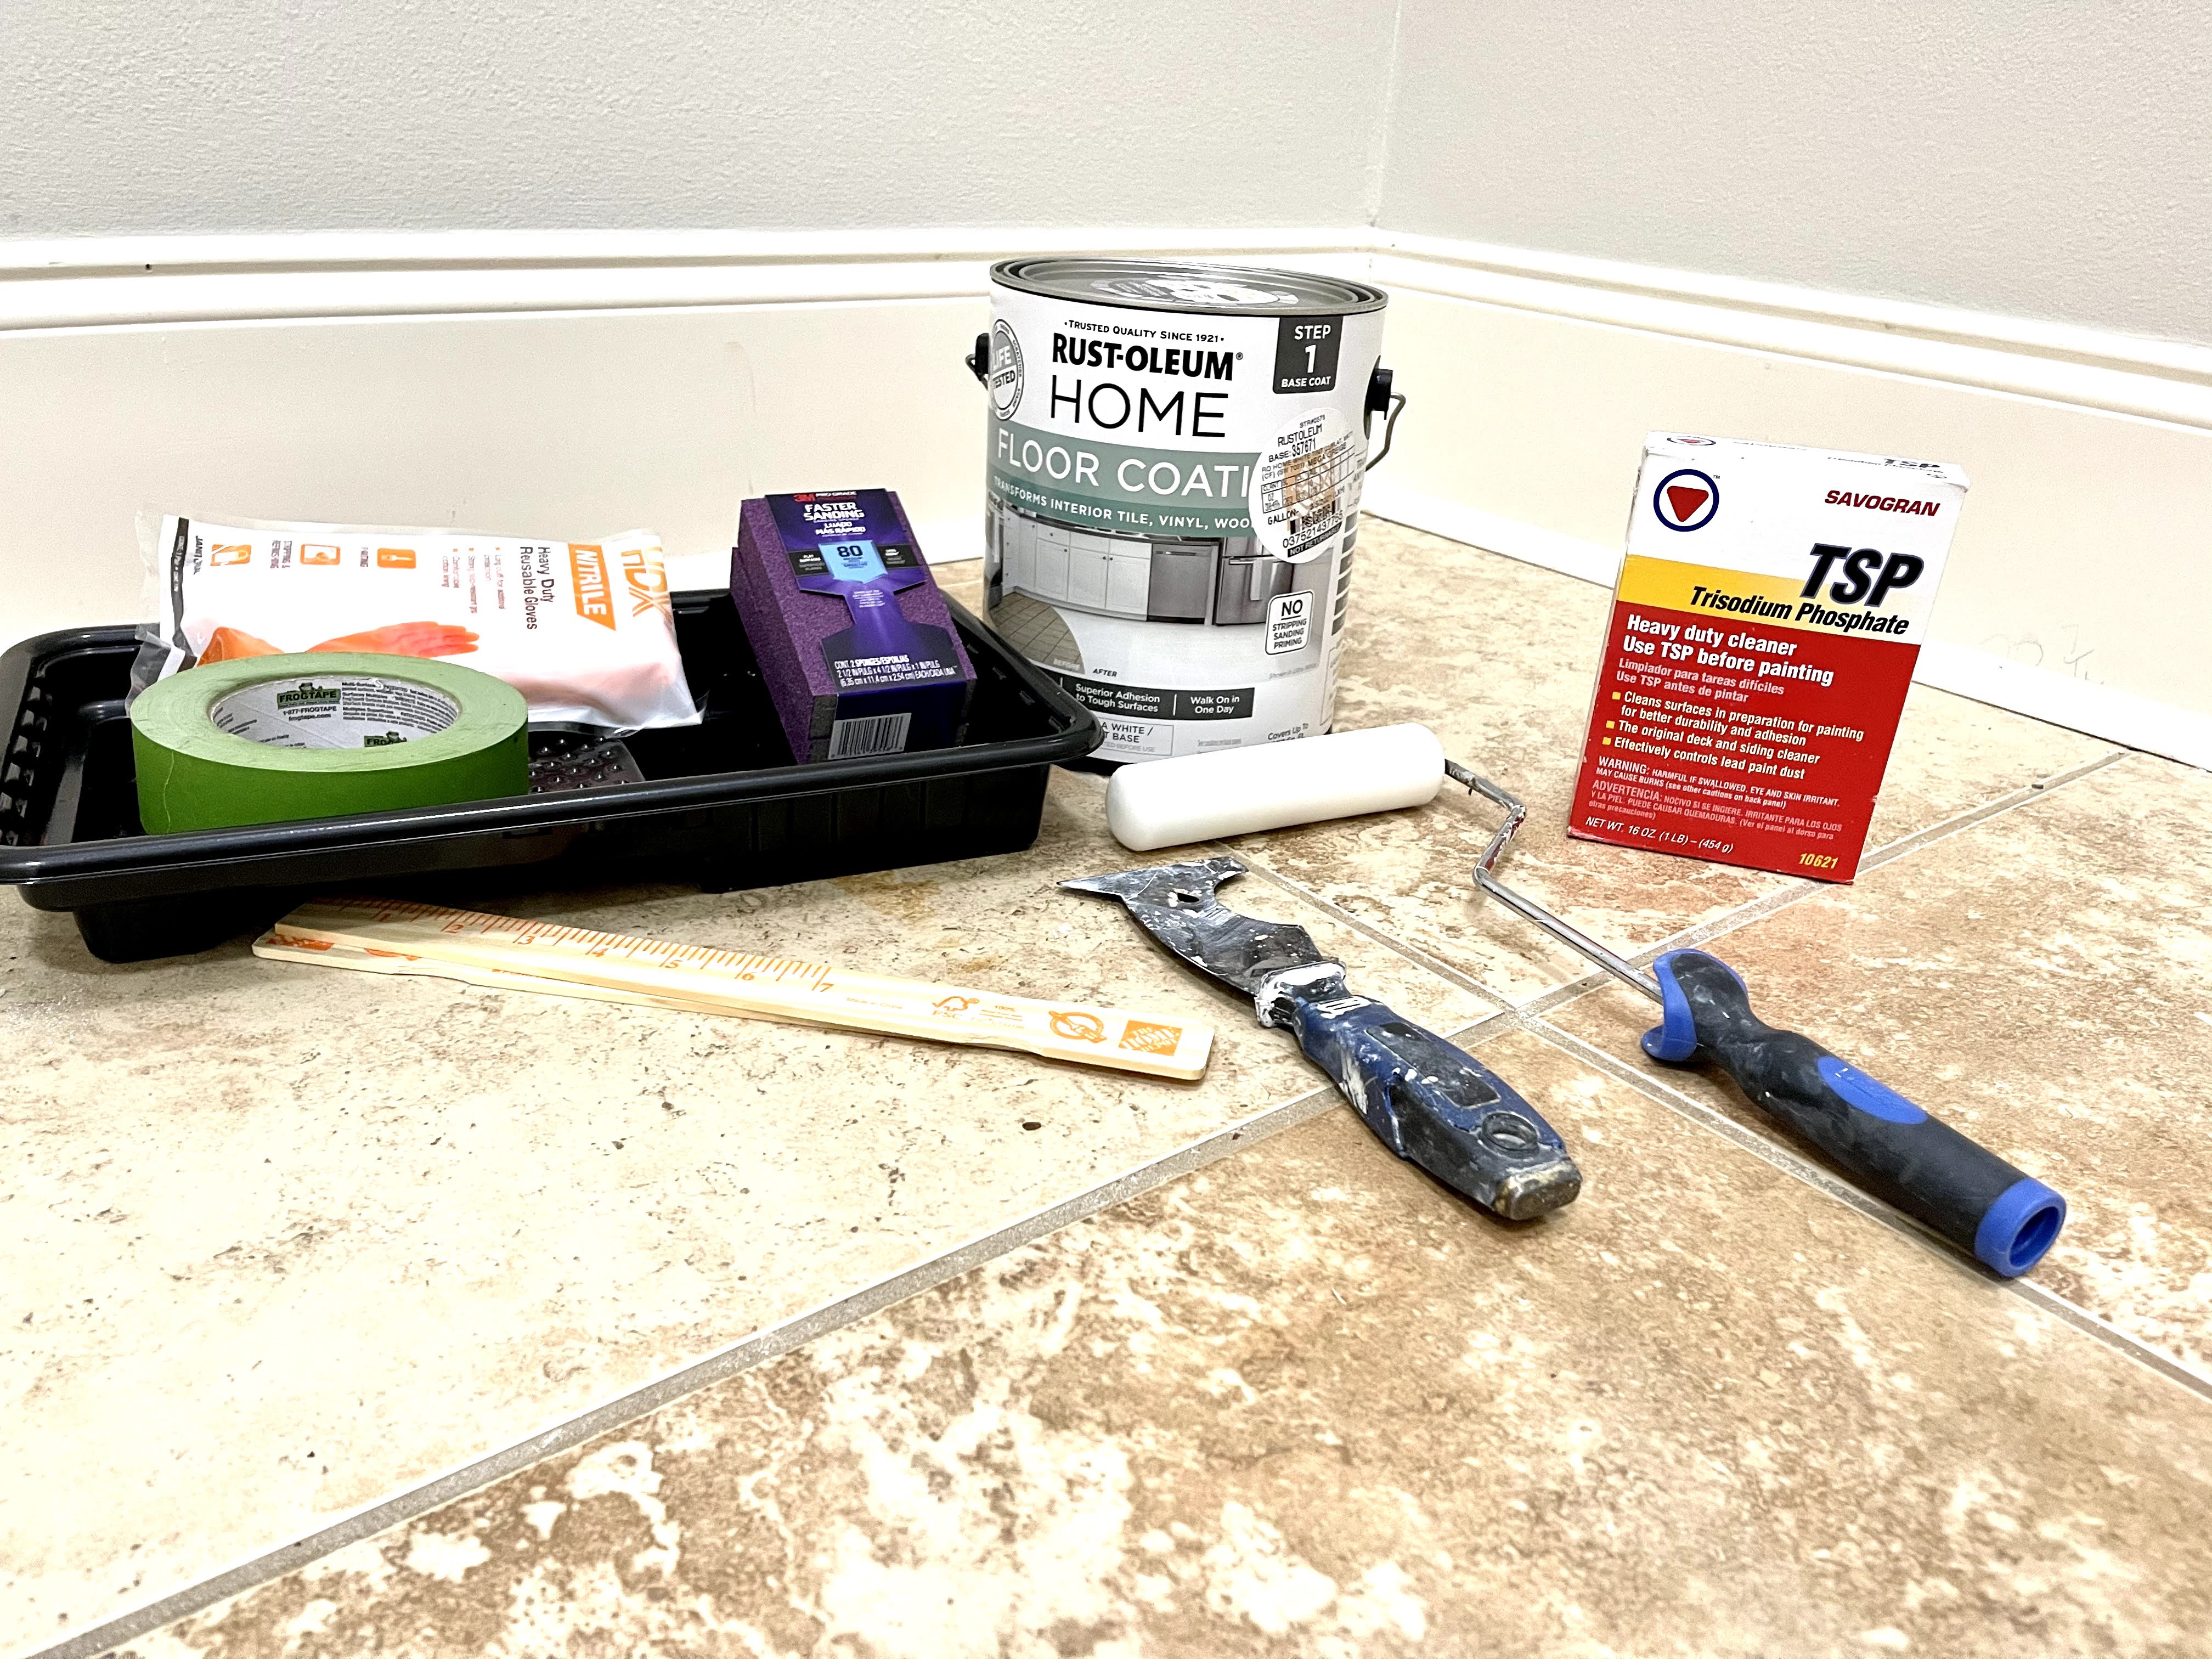
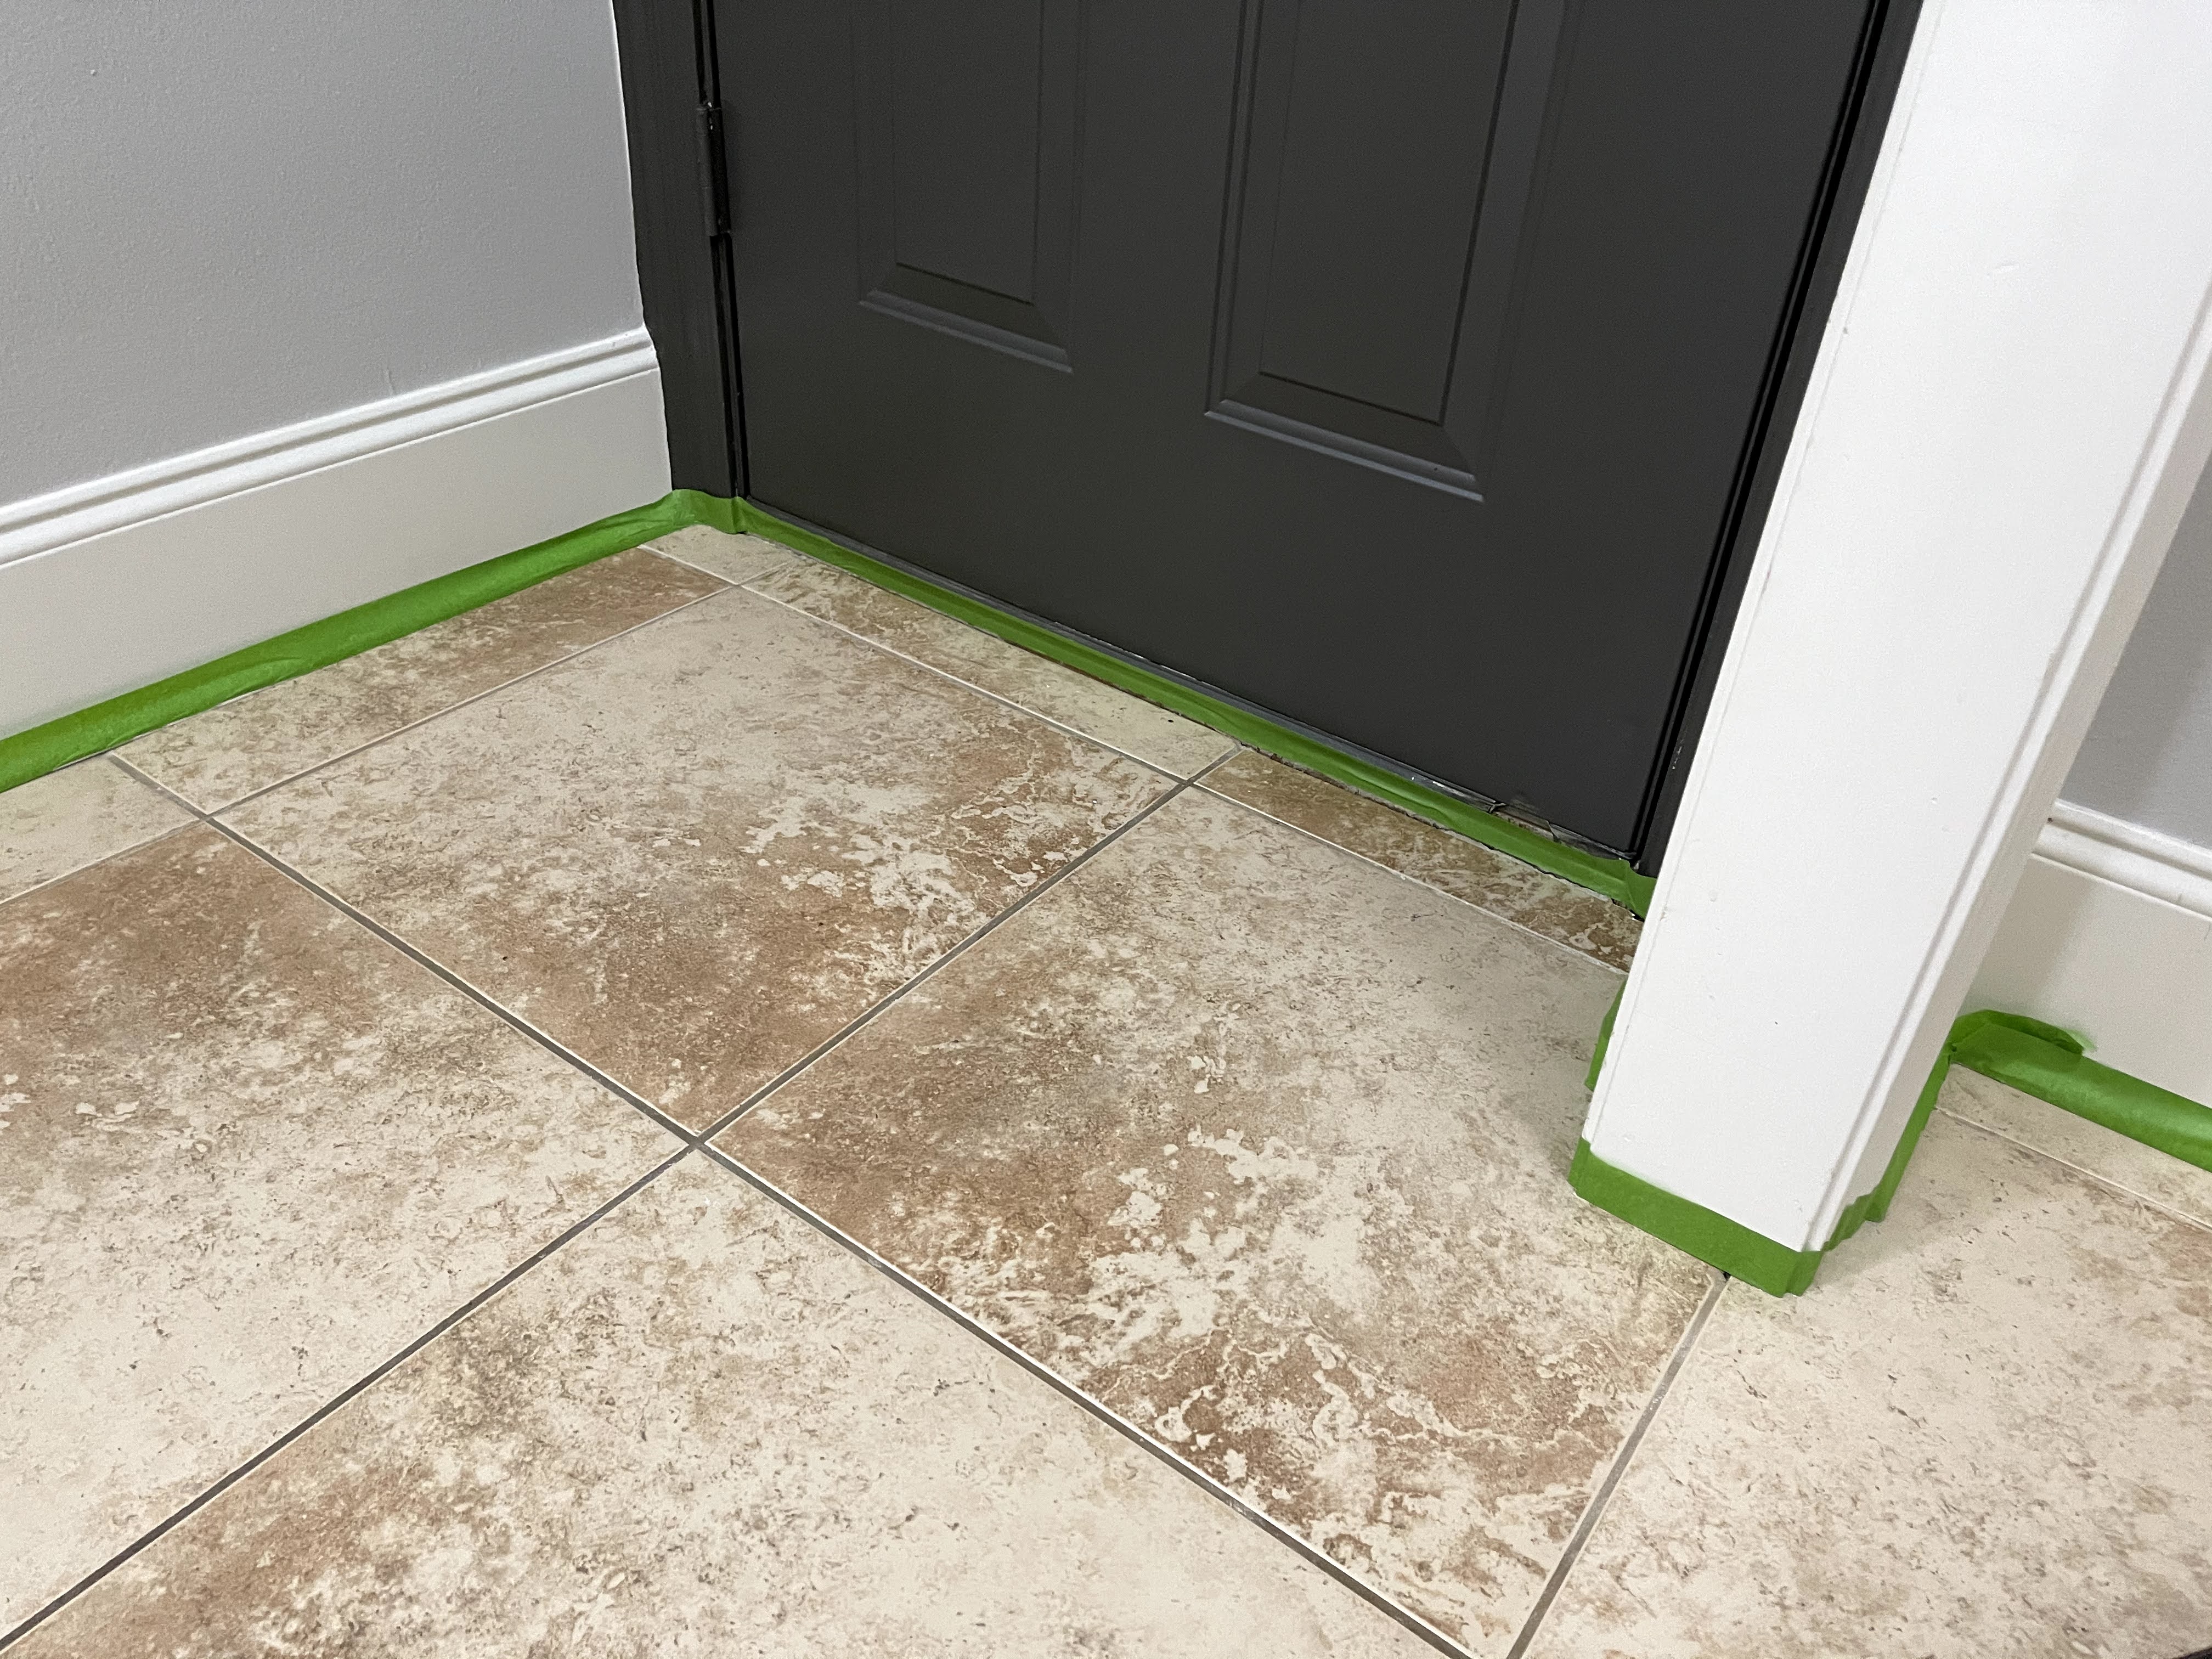
Next, was my FAVORITE step: taping off the baseboards! (Reread that last statement in the most sarcastic voice you can muster.) I used Frog Tape around the perimeter of the flooring, along the baseboards and bordering the wood and carpet that run against the tile. I was careful to get a really clean line and to burnish (rub it in) the tape with my fingernail, ensuring a strong adhesion. This process all took one afternoon. I’d recommend knee pads if you have them! The Frog Tape was really easy to use and stayed in place throughout the entire process.
That night, I painted the base coat on the floors. Honestly, I could have stopped there and sealed it. However, I wanted the look of encaustic tile. To paint the tiles, I used a combination of a paintbrush and a 6″ foam roller. I used the brush to paint the corners and grout, and I smoothed it with the foam roller.
Bayou Blonde Tip: Any time I paint, I opt for disposable rollers and paint trays. I really hate the mess involved with cleaning them. This saves me so much time, because the only thing I have to clean is my paint brush.
This is where I made my biggest mistake. I didn’t order my stencil until this point in the process. Don’t be like me. Not sure what I was thinking there! I guess I just got ahead of myself.
I went with Cutting Edge Stencils in the Verona pattern. They were amazing to work with, but I needed a special size for my oddly shaped 19 5/8″ tiles. If I had ordered this at the start, it would have been fine, but I had to wait almost two weeks for my custom stencil to come in. This was 100% my fault, because a two week turnaround for a custom stencil is pretty awesome in my opinion!
Once my stencil came in, I swept and wiped the floor down again. Then, I had to go back over it with the base coat to touch up some of the nicks and scuffs from two weeks of walking on it.
Step 2: Stenciling the Pattern
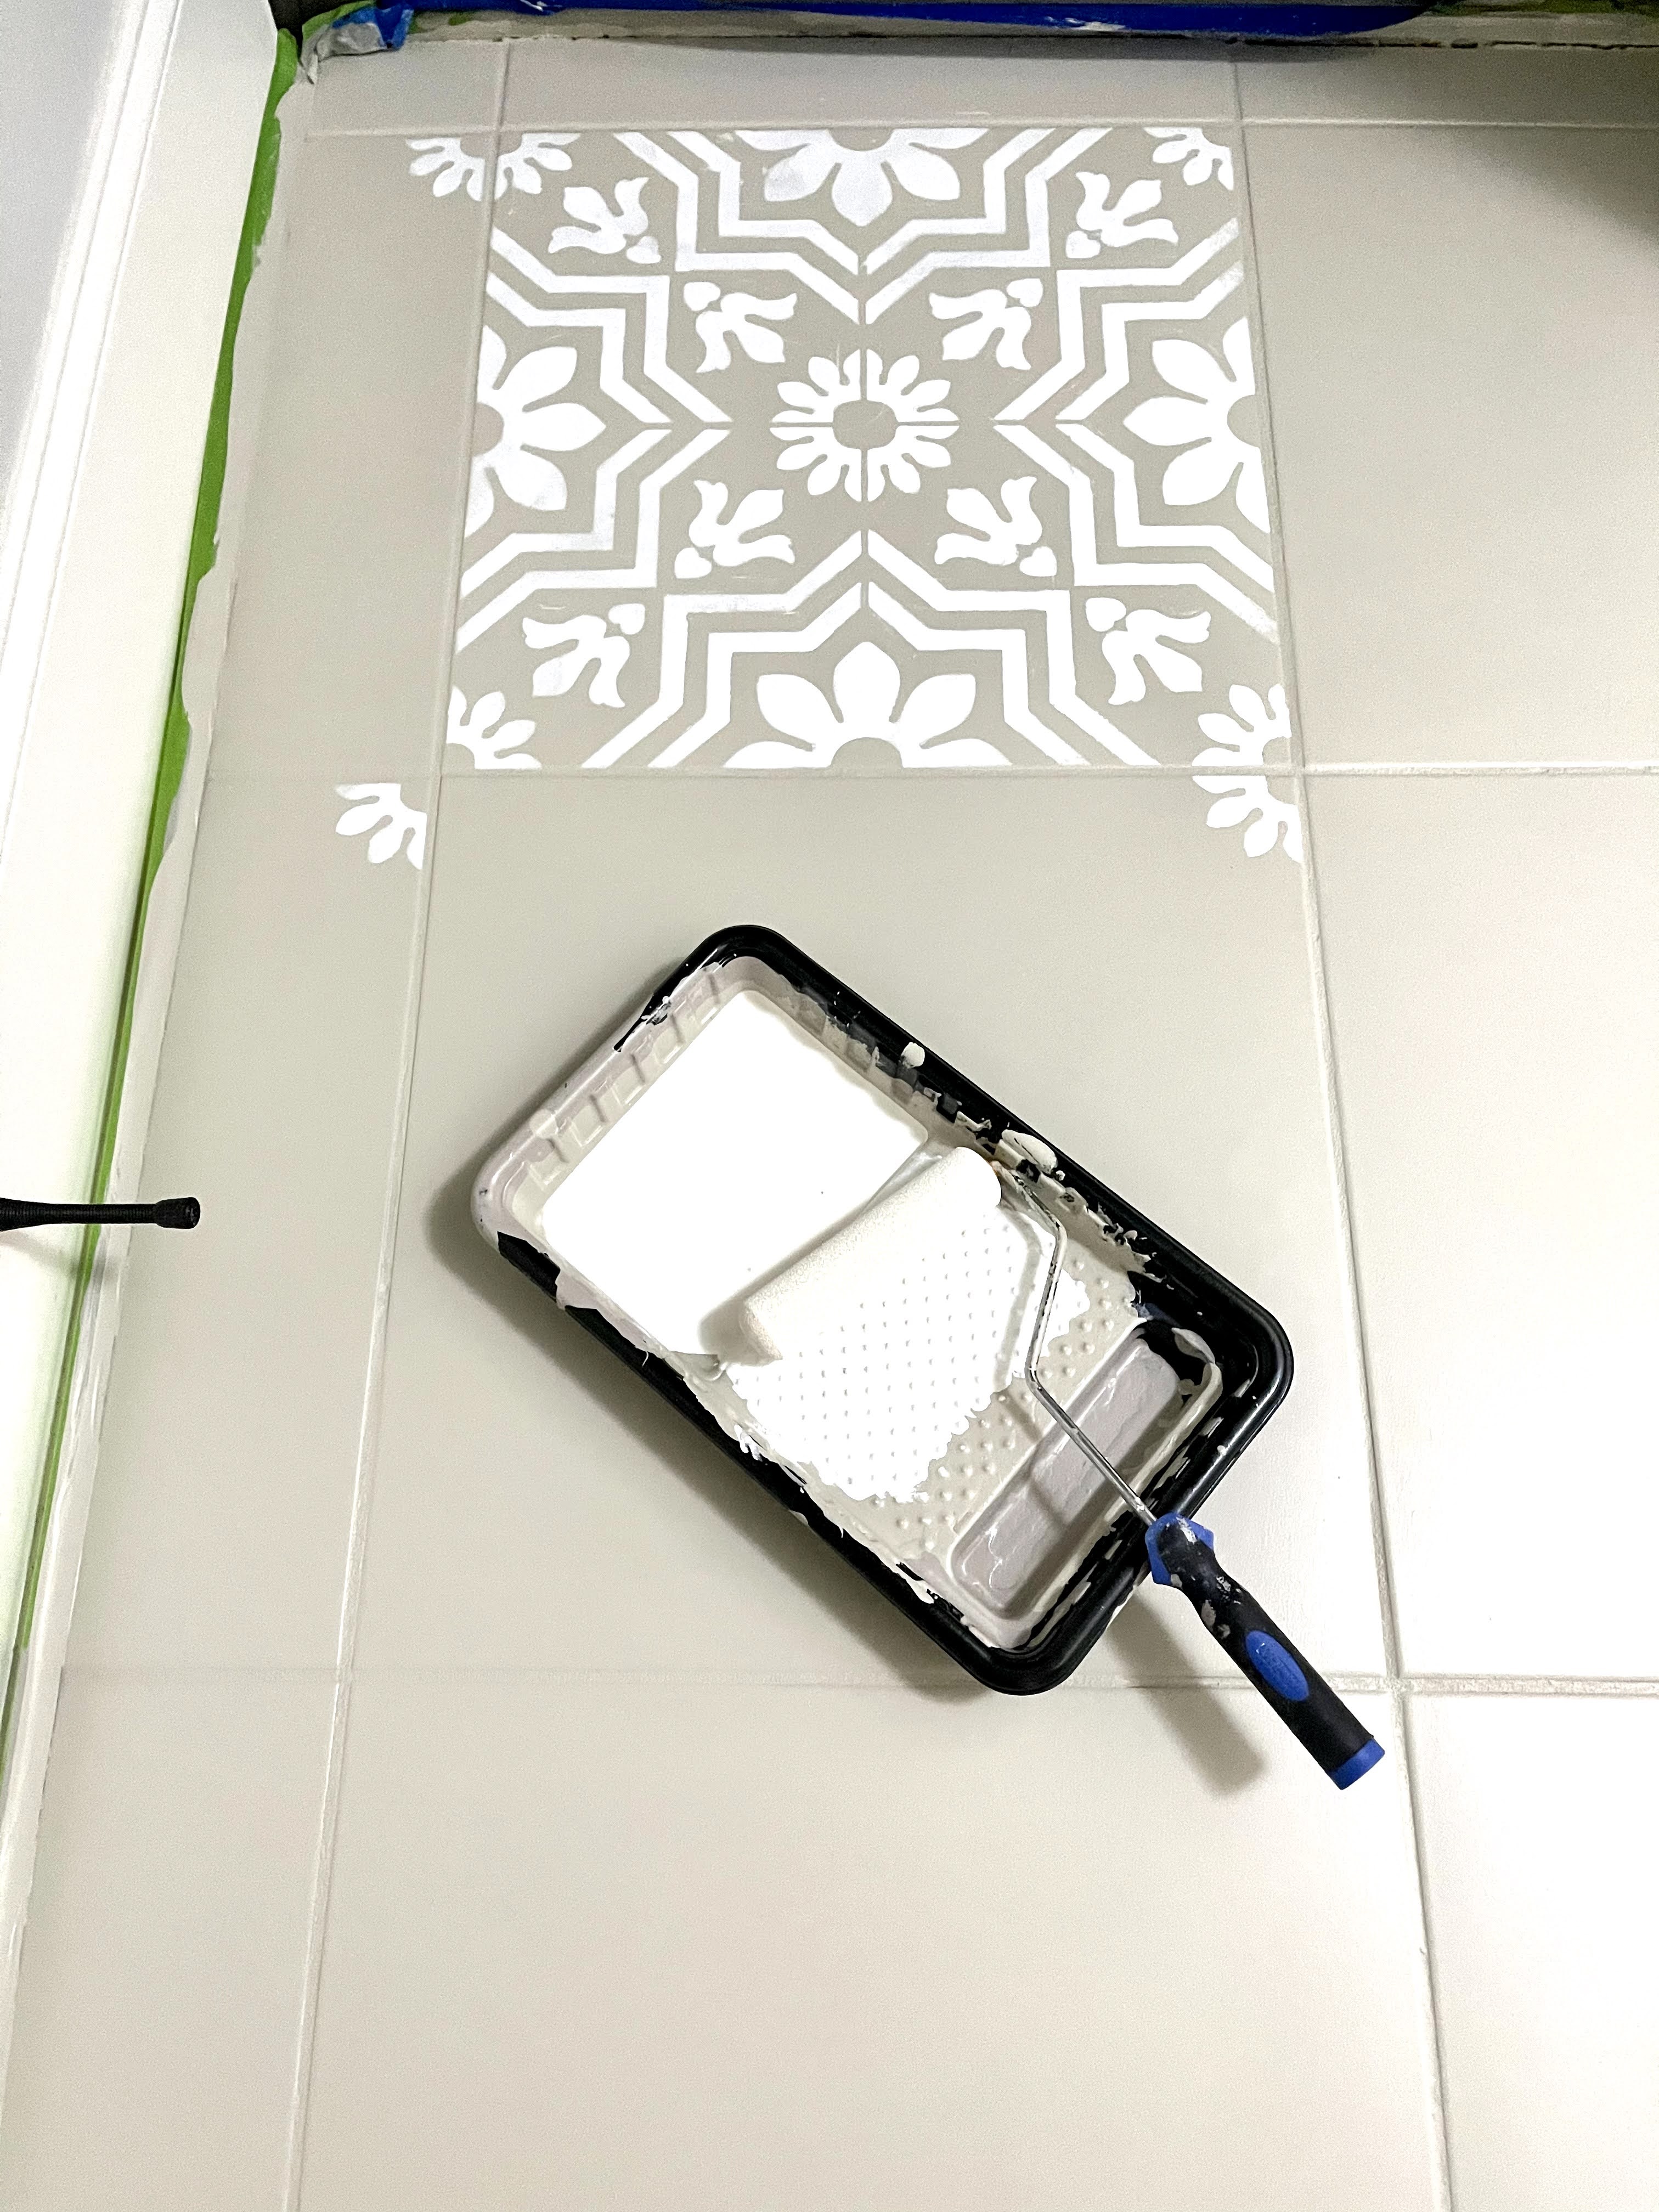
The next night, I started stenciling when the kiddos went to bed. I chose to use Behr Chalk Paint tinted to Creamy by Sherwin Williams. I went with the chalk paint because the consistency is easy to work with, and I wanted variation in the pattern. The chalk paint allowed me to apply the pattern thinner in places, giving it a softer, less “perfect” look. I also used the foam roller for this step, although I did have to use a brush on some of the edges.
The stencil was very easy to work with, and I was surprised at how durable it was. I could actually reuse it on another project. I worked on every other tile, to give the pattern time to dry. This worked really well and kept me from getting paint on the back of my stencil.
One very important detail is that I used Stencil Ease Repositionable Spray Adhesive from Amazon to help the stencil stick to the tile. I would say this is an absolute MUST have if your project is as large as mine. It made a huge difference. I used most of the bottle in this one project.

I sprayed the adhesive in another part of the house to avoid overspray. (I covered the floor with plastic.) Then, I carefully positioned the stencil, using the grout lines to make sure it was square. The spray adhesive made it sticky, but I could still reposition the stencil until I had it just right. Then, I would roll the design on. I made a video showing the process.
Make sure you don’t use too much paint on the roller! If you do, the paint will bleed under. Then, skipping a tile in between, I repeated the process. Once those tiles were dry, I could go back and stencil next to it. I re-sprayed the adhesive again about every four tiles.
The stencil instructions said to wash the stencil periodically. I did this once, but my stencil was so big, it was really difficult to do without getting paint everywhere. I ended up keeping a damp rag nearby, and wiping it off when there was paint bleeding through.
Corners and edges were tricky. I did not cut the stencil because the design was so elaborate. I didn’t want to mess it up. I used painters tape to attach the stencil to the wall. Then, I bent the stencil and rolled it as far as I could. This is when I used a brush to tap the paint up to the edge. A stencil brush would have been helpful, but I managed. I can’t over-emphasize that this part was not easy. Definitely take your time. If it turns out badly, you can wipe off the paint and try again.
The next day, I went back with a small brush, touching up smudges on the base coat and the stencil paint. In the area around the toilet, I actually freehanded some of the design. There was no way to get that big stencil in there. Since I went for a more imperfect look anyway, this was fine.
The paint had to cure for 24 hours before applying the top coat. That meant no laundry or access to my daughter’s bedroom for that time. We really tried. Other than a couple of mishaps, we stayed off of the floor.
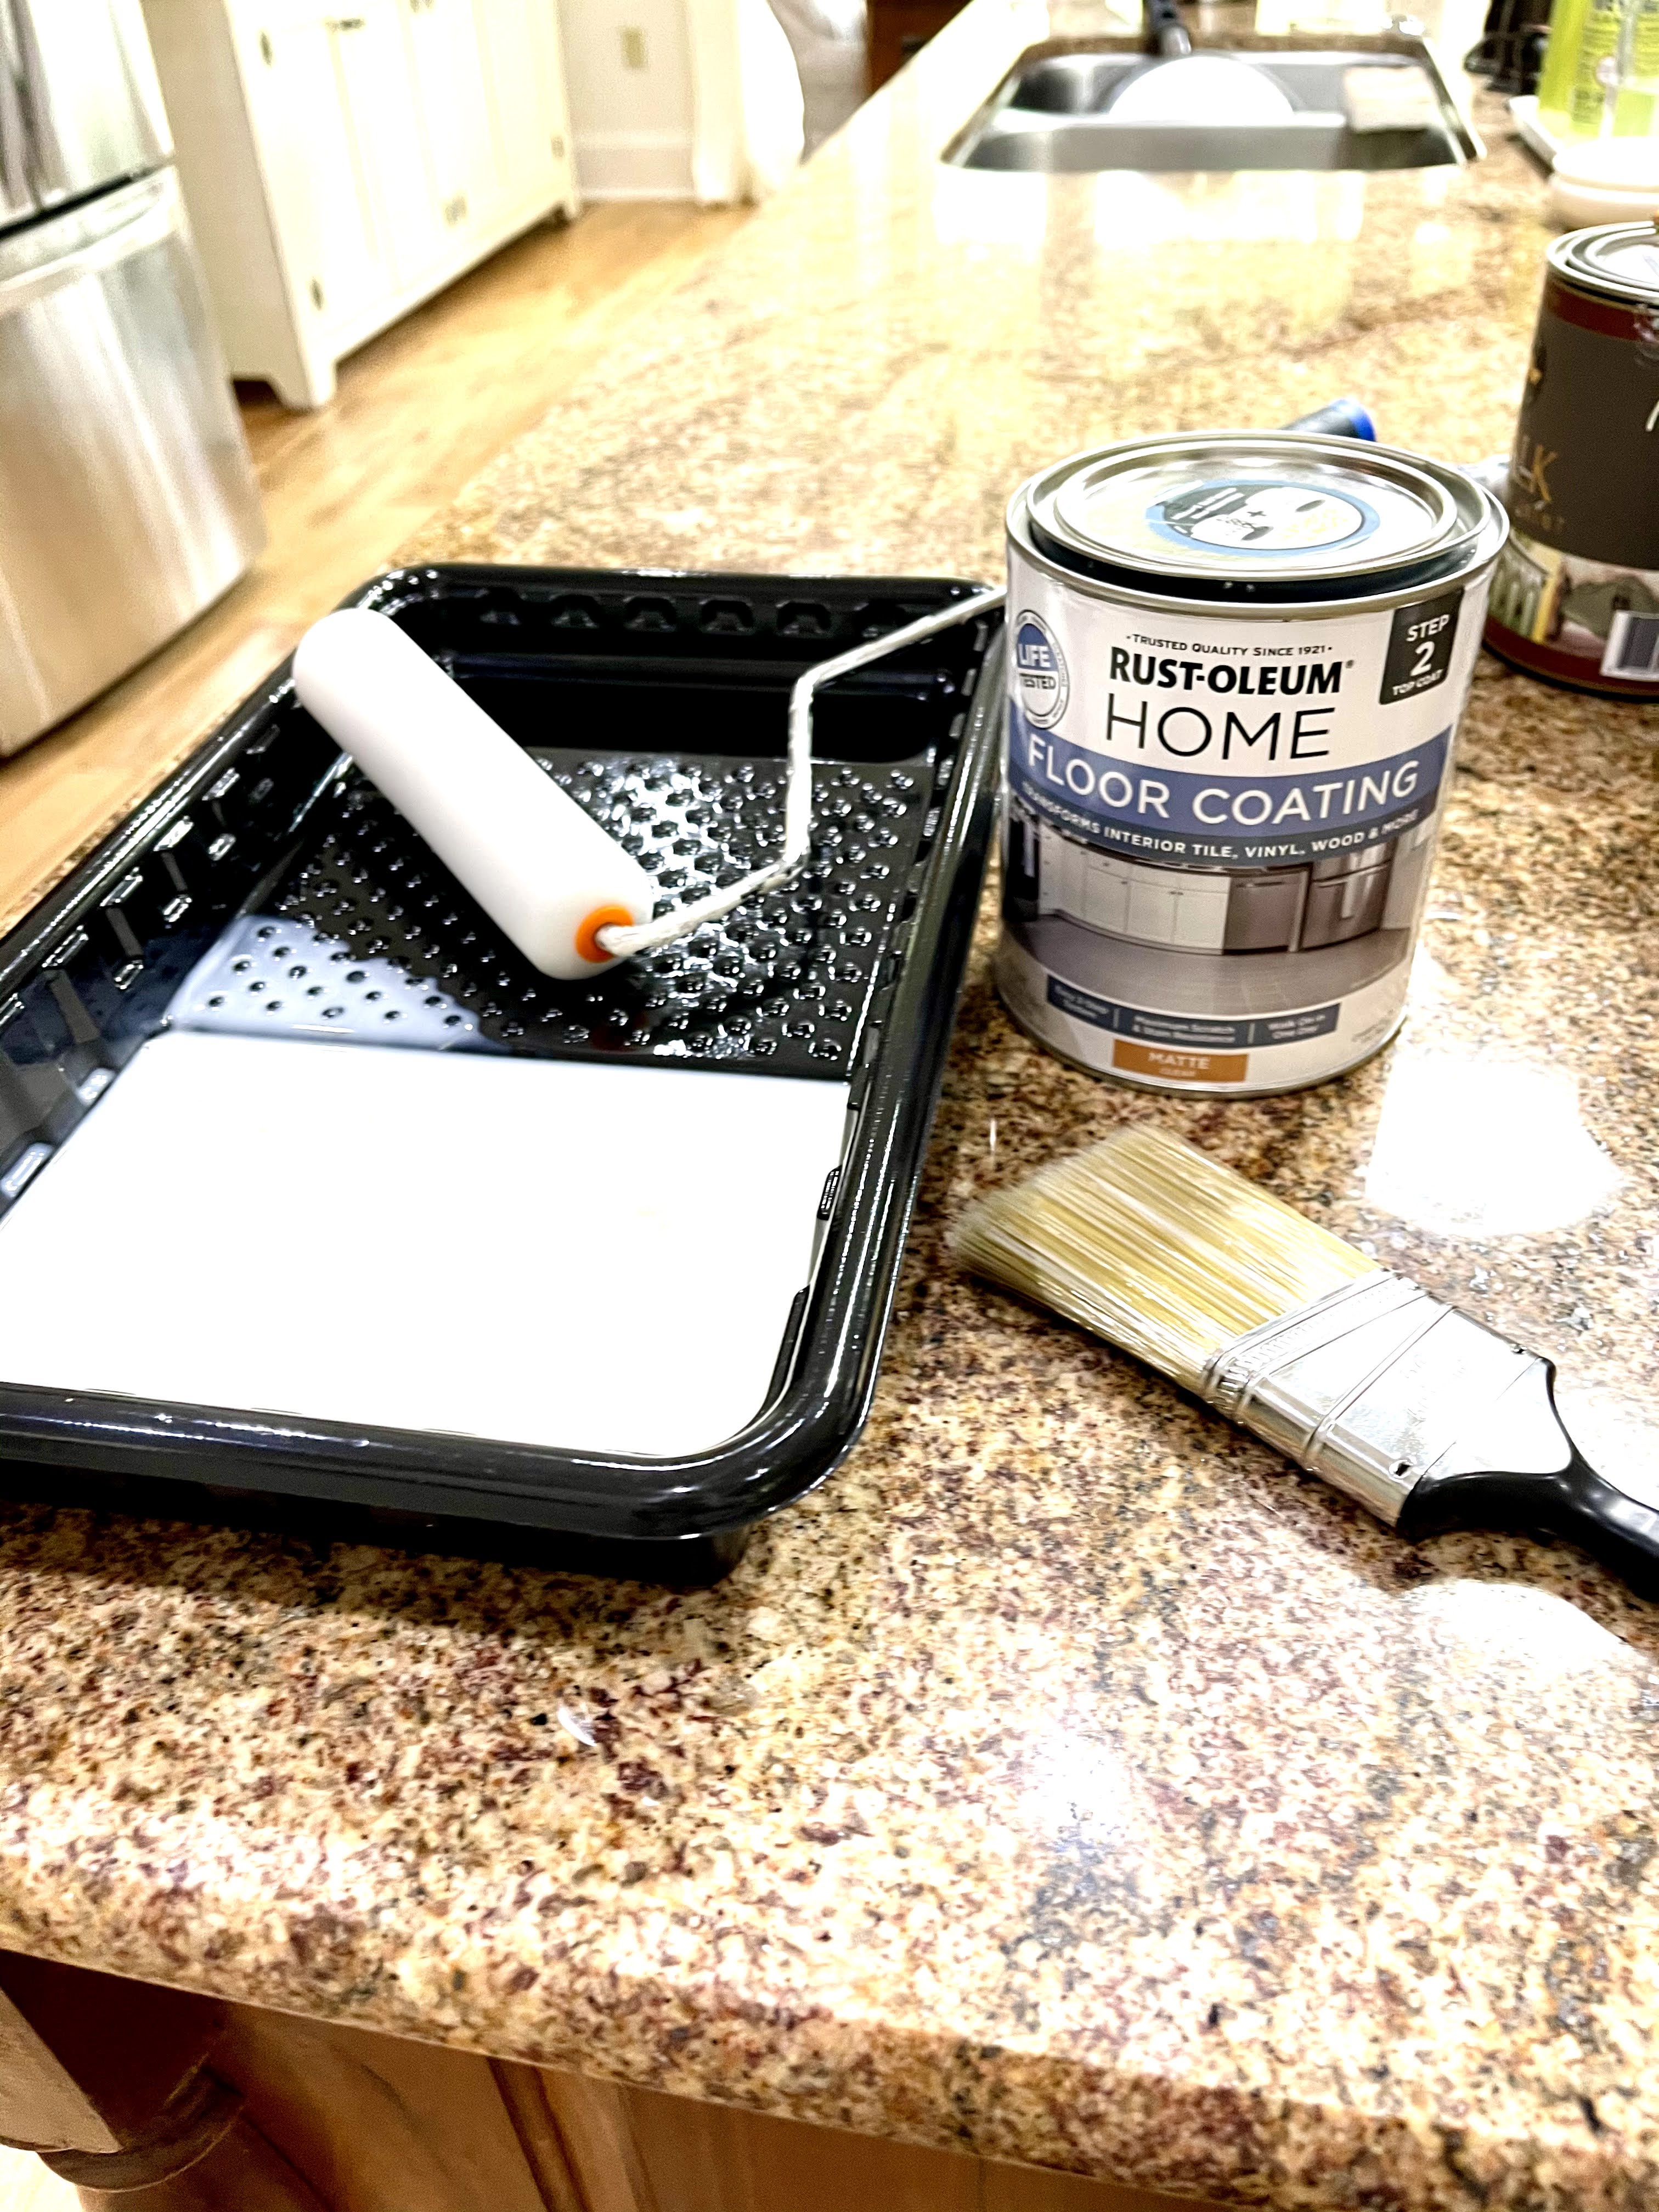
Step 3: Sealing the Paint
I applied the Rustoleum Home Floor Coating Matte Topcoat the next morning. I chose to use the matte finish, rather than glossy. It has a small amount of shine, but not much. I was worried about this step, but it was actually very easy to do. The water-based topcoat went on easily and didn’t leave any streaks. I used the same technique as when I did the first coat: brushing on the grout and edges first, and going back with a foam roller.
This coat went surprisingly fast. It has to dry for 24 hours before anyone can walk on it, but it was dry to the touch in about an hour. After six days, furniture can be moved in, and the floors can be mopped.


I’ll update this post later to share how the floors have held up to our wear and tear. So far, we moved a refrigerator onto the floors with no scratches! If you have any questions about the process, please leave a comment below. I also shared several videos showing each step on my Instagram account, @thebayoublonde. I even showed how the stencil process worked.
If you have any questions, please comment below. I tried to cover all of the information you would need to replicate this project.

Like what you see? Subscribe to receive blog posts delivered right to your inbox.

Great job!! This is really amazing and looks so good. You did an amazing job. I love the thing you did at the end of this blog where I can slide between the before and after picture! It makes it really easy to see the HUGE improvements you did. Beautiful job!
Thank you!