This post has been a long time coming. Between kids starting school, a stomach bug that cost us a couple of days of school, and a major hurricane, there were plenty of reasons to put off finishing this project.

Despite the obstacles, I’m close to completing the master closet, and the result is much better than I expected. I started with editing about half of my clothes, shoes, and accessories. In this previous project post, I shared the process and tips on how to edit your closet. If you haven’t checked it out, you can even download a checklist to help you complete the task.
Honestly, I could probably get rid of another third of my clothes (at least), but I’m happy with the progress so far. Because I’d let my closet get so out of control, it took a long time to go through everything. Next time, it will go so much faster because I don’t have as many clothes. I also want to be patient with myself, understanding that I’m not going to become a minimalist overnight. My biggest takeaways from the process: Edit often, and be careful about what I allow into my home.
My biggest takeaways from the process: Edit often, and be careful about what I allow into my home.
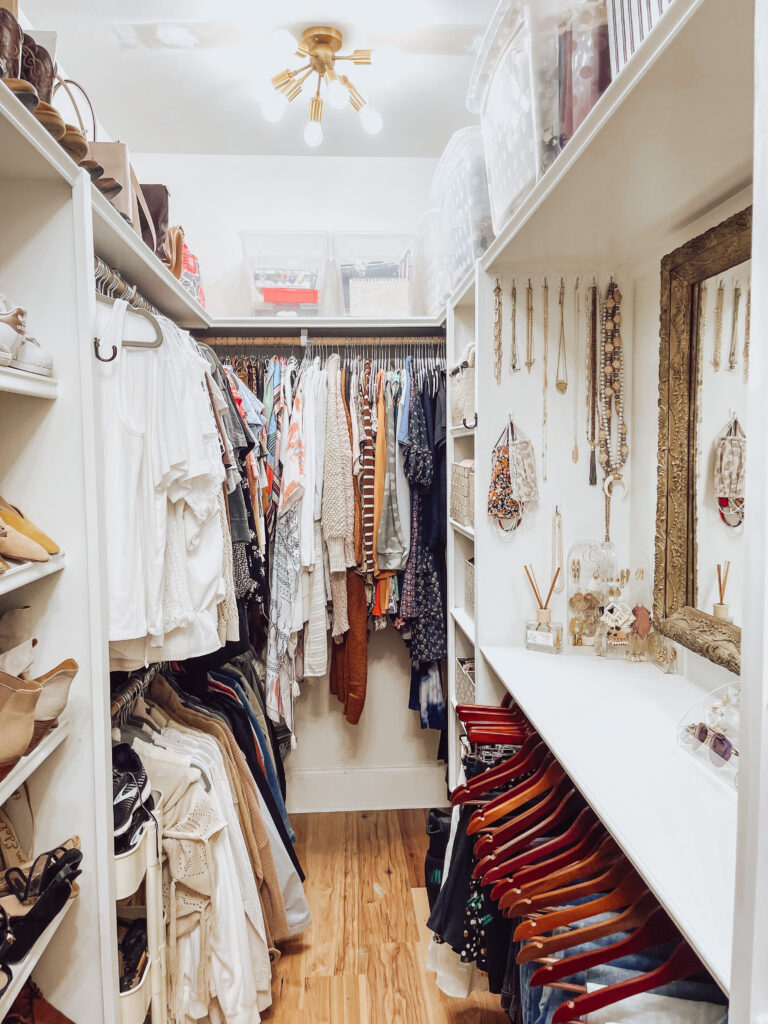
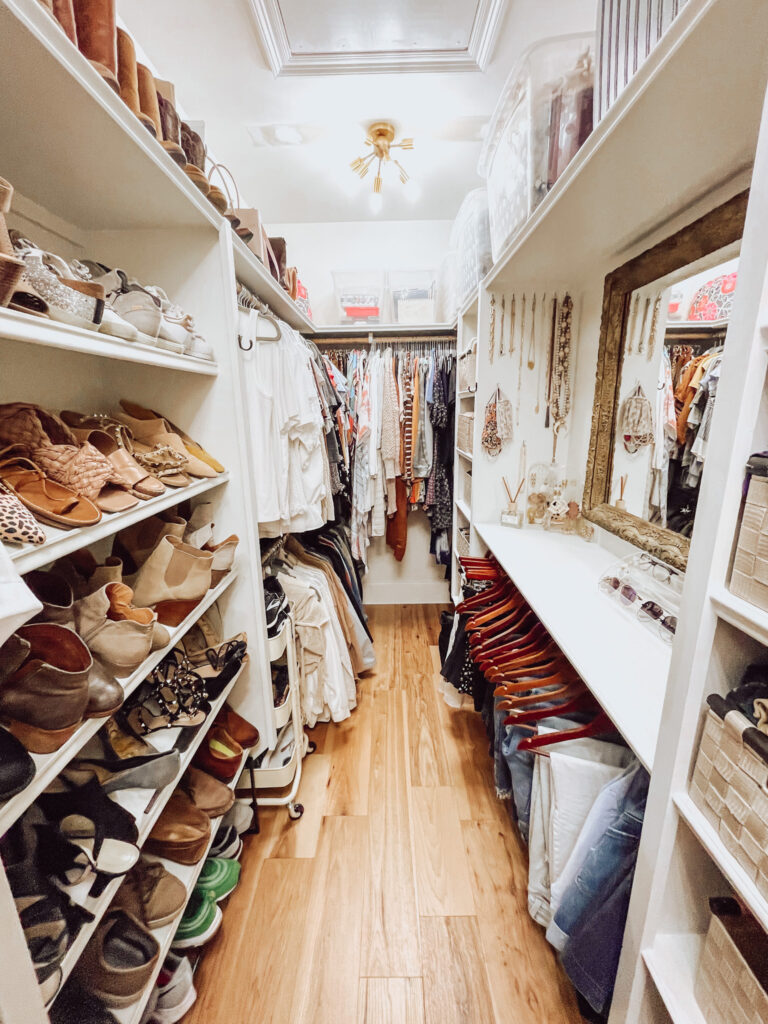
Probably the biggest change, after reducing the volume of clothing, was the lighting I installed. We had fluorescent lights that weren’t beautiful or functional. Installing bright lights helped me find things and enjoy getting dressed each day. It’s so organized and pretty, I want to keep it neat. If I’d known how easy it was to change that light fixture, I would have done it years ago.
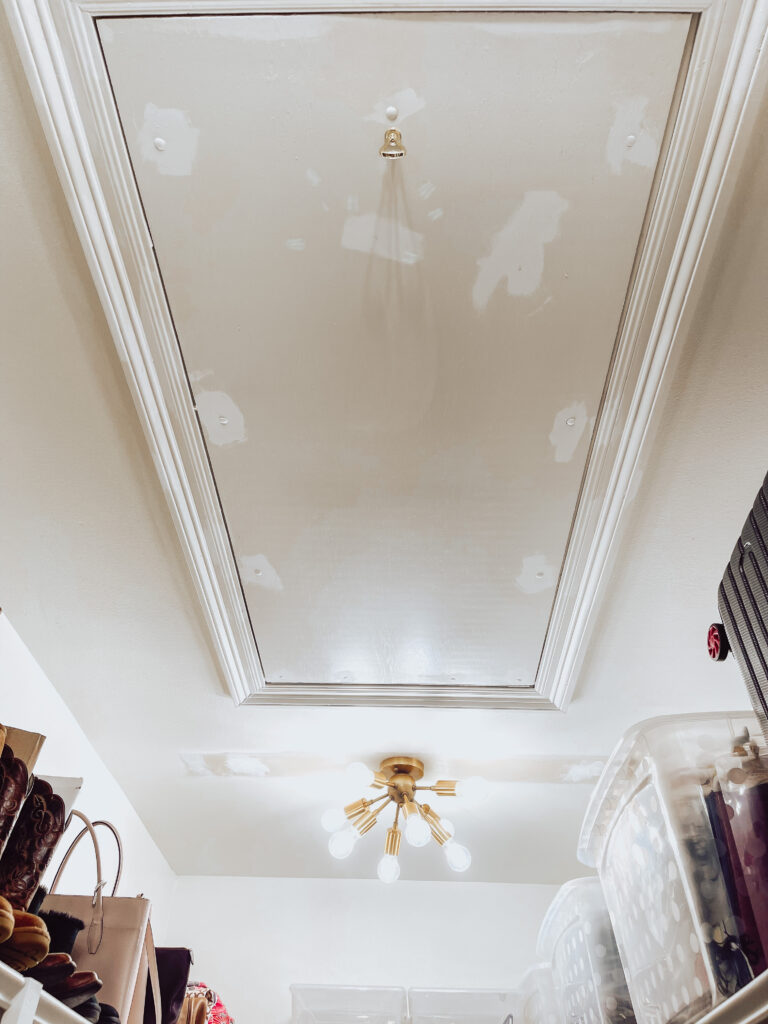
You can see from the picture above that I need to do some touch up painting on the built-ins and ceiling. I’ve went back and forth about what to do on the ceiling — whether to paint it white, add a color or add wallpaper.
I want to add visual interest and a little color, but it could easily feel cluttered and overwhelming. I found several peel and stick wallpapers that I loved (linked below), but I think I’m going to go with a neutral mauve shade. I purchased a quart of Sherwin Williams Chelsea Mauve, and plan to work on the ceiling and final touch ups this week.

As far as closet organization goes, I had a lot to work with from the start. My husband and I share this closet, and the hanging space and built-ins provide great storage. Since we live in the South, I don’t need a ton of winter clothes. I decided to keep everything in one place and avoid switching out items.
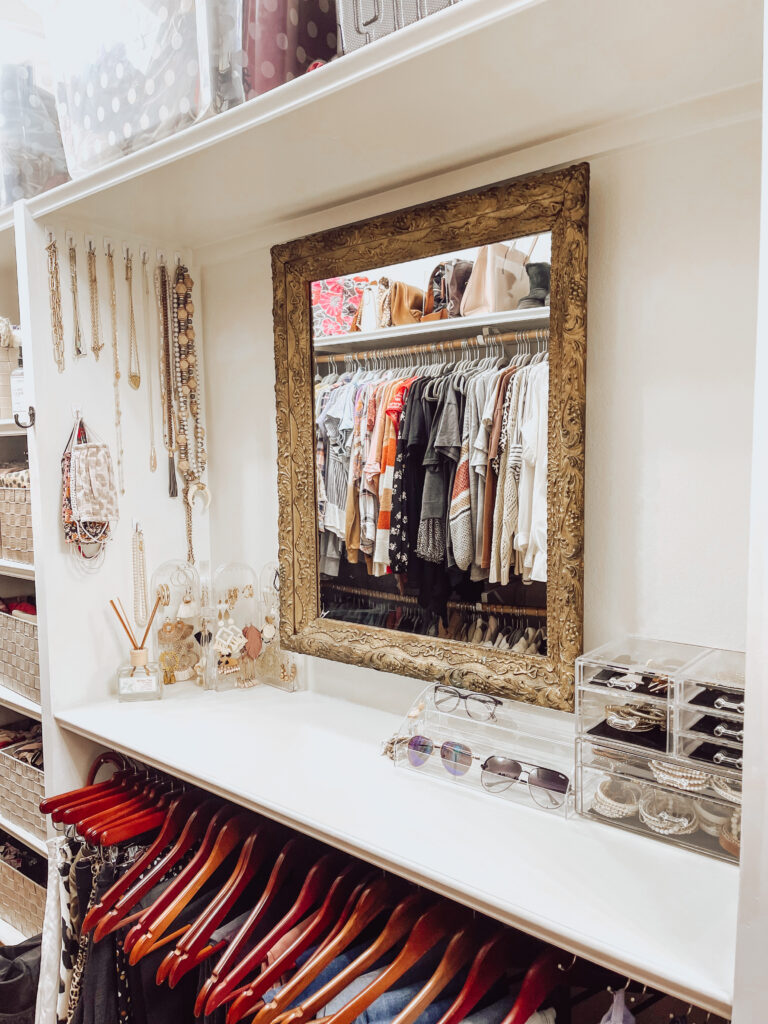
A while back, I removed the hanging rod in the middle section on one side of the closet and added a shelf. I’ve loved having this place to set things and add accessories. I brought in an antique mirror from my grandmother and modern, acrylic organizers to keep everything organized and light. I like the contrast of the modern with the the vintage. The modern lights also add needed style to the small space.
I put together the board below as I ordered items and shopped. Keep in mind that these are affiliate links. If you click on them and end up purchasing something, I may receive a small commission.
Master Bedroom Closet Design Board
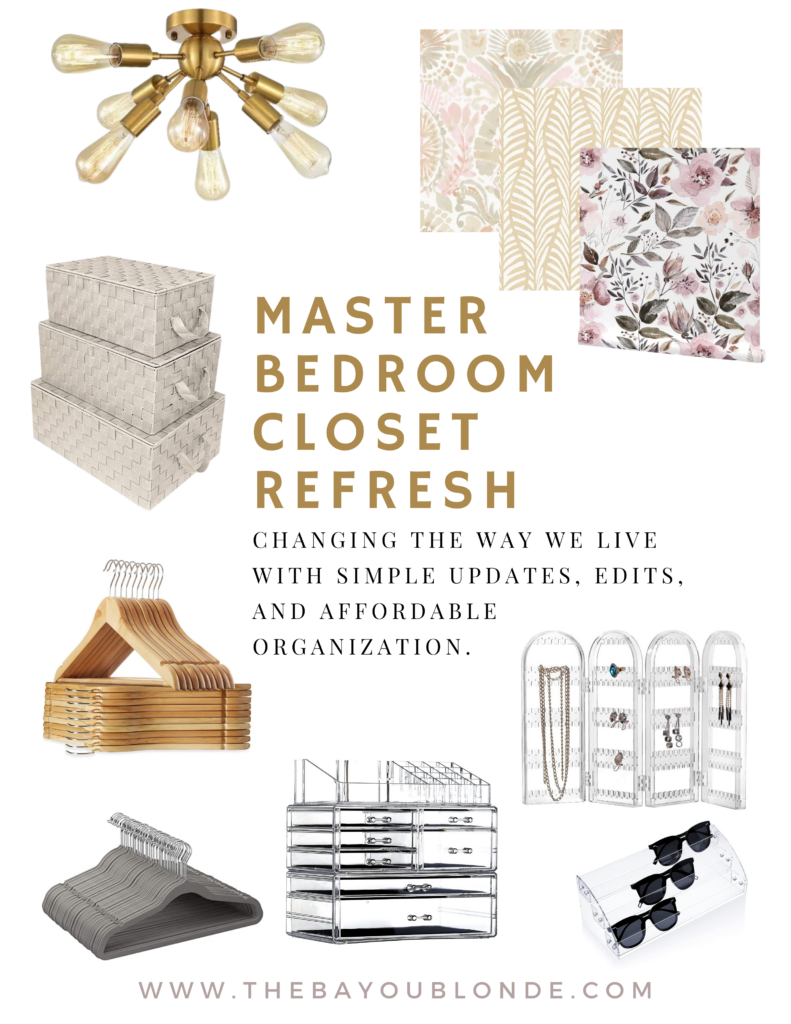
I’ve linked everything I used in my closet, including the lights, organizers, hangers, and my top three picks for removable wallpaper. Keep in mind these are affiliate links, and when you purchase something, I might get a small commission (thank you!).
Light Fixtures & Light Bulbs // These were a steal, and they made the closet so much brighter! And the price is amazing — look for coupons to save even more. The bulbs are a nice, clean white, and I love buying them online. That way when I need to replace them, I know exactly what I purchased.
Accessories Organizer, Sunglasses Holder, Earring Organizer // These acrylic storage pieces are affordable, and I like that they don’t add more visual clutter to the closet. After I edited my accessories, everything fit comfortably, with room to spare.
Command Hooks // These are amazing! I used them for my necklaces, face masks, and all of our hats. I may end up doing something else with the hats, but it was an easy inexpensive solution.
Large Clear Bins & Small Clear Bins // I like that the contents of these bins is easy to see, and they aren’t really heavy visually. I also wanted something that would keep moisture out, since some of the items in them are paper.
Locker Shelves & Clear Shelf Dividers // These are two options for storing extra handbags. I purchased the locker shelves at first, but I think I prefer the dividers. I plan to use the locker shelves in another project to add extra space.
Woven Bins with Lids & Similar Woven Bins // I already had some of these bins from a few years ago when I “organized” my closet. I found a similar style online. There are so many options with sizes and colors. I liked these because they don’t scratch the shelves when I pull them out, and the size worked for our oddly shaped built-ins.
Wood Hangers, Velvet Hangers & Shoe Rack // I had some wooden hangers, so I purchased a few more to make everything match. They work really well for my husband’s shirts and all of our pants. I already had a ton of the velvet hangers. I actually ended up with about 100 extra hangers after editing my clothes. I kept a handful in the laundry room and donated the rest! The shoe rack was so inexpensive, and I was able to customize it easily to fit beneath the built-ins and add a little extra storage.
Attic Door Hook // Who knew this existed?! I changed out the unattractive cord for a sleek hook. I stashed the handle behind the door. It took five minutes and made a huge difference!
Boho Wallpaper, Beige Graphic Wallpaper & Floral Wallpaper // All of these are on Amazon and are very affordable. I’ve never installed this type of wallpaper, so I don’t know how it holds up over time.
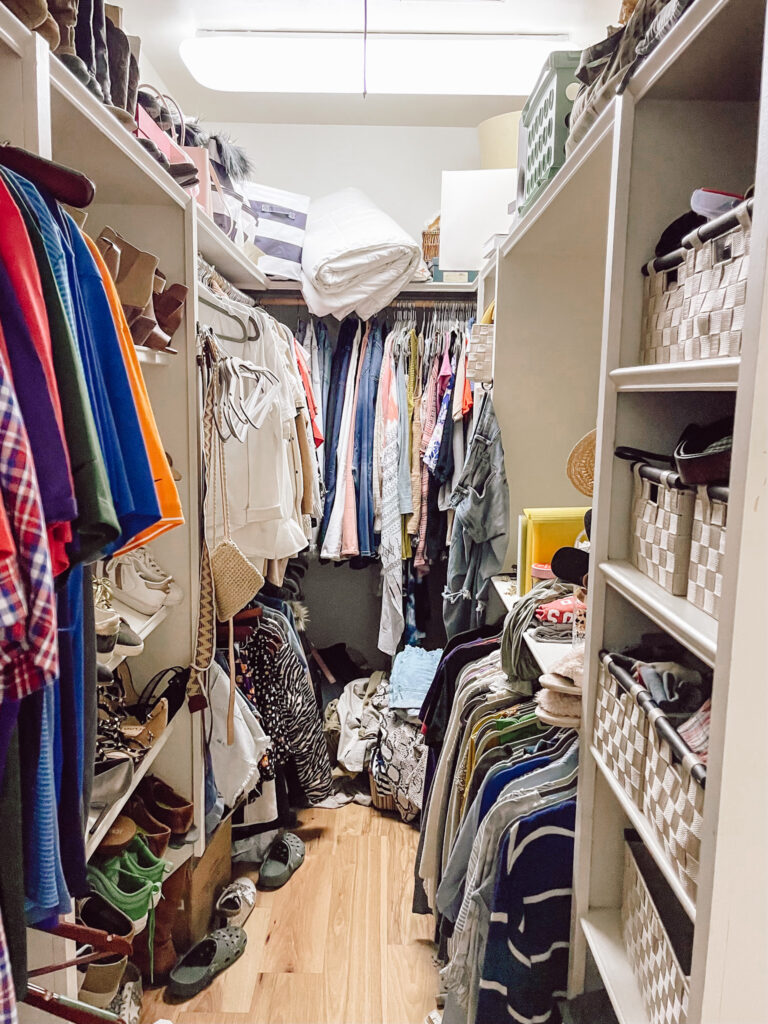
Here is where I started…
And here is where we are today…
I plan to share the finished project next week, barring any natural disasters or illness… I’d love it if some of you will join me and share your progress on social media.

Thanks for stopping by my today. Let’s stay in touch! Subscribe below to receive posts by email or follow me on Instagram or Facebook.

It really turned out nice. Great job, sweetheart!